InDesign Accessibility Quick Reference

Use Paragraph Styles for Headings
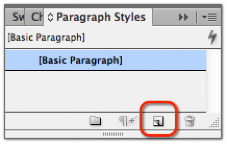
- Open the paragraph styles panel:
- Type > Paragraph styles.
- Create a new blank style: Select the New Style icon.
- Open the style editor: Double-click on the new style.
- Assign a name to the style: In the General category, type a Style Name (it can help to add the level of the heading to the style name, e.g. "Instructions H1," or simply "H1").
- Modify the style’s visual appearance as desired. Not all headings of the same level must look the same. You can create multiple H2 styles, for example.
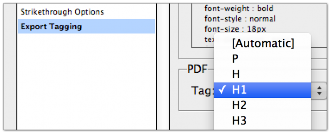
- Assign the appropriate heading level: In the Export Tagging category, go to the PDF Tag selector and choose H1 or H2 or H3, etc.
- Assign a heading style to the heading: Select the heading text in the document then click on the appropriate style in the Paragraph Style panel.
- Create a well-structured document by using heading styles in all appropriate places and creating a logically-organized hierarchy of heading levels.
When Importing from Word, Map Word Styles to InDesign Styles
- Import a Word file: To import text from Word, select File > Place.
- Map Word styles to InDesign styles: In the dialog box, select "Show Import Options" and "Preserve styles and formatting" and "Customize Style Import." Select "Style Mapping…" and map the Word styles to your InDesign styles. You can create new styles here, if necessary.
Add Metadata
- Add a title: File > File info. Type in a Document Title at a minimum.
Text Frames
- Use threaded text frames for continuous text, rather than disconnected text frames, for proper flow of text for screen readers.
Lists
- Use real lists (don’t fake them): Select the bulleted list
 or numbered list
  icon from the Control menu (in Paragraph mode). Lists can be styled with different bullets, margins, etc.
Images

- Anchor images to the appropriate location in the document (for accurate reading order) by selecting and holding the mouse on the anchor icon or the blue square in the upper right of the image and dragging the mouse to the location in the document where you want the image to be read. Let go of the mouse button.
- Set export options: Select the image in the document, then in the menu select Object > Object export options.

- For meaningful images: Under Alt text, if the image has a title or description already in the metadata, choose From XMP: Title or From XMP: Description. Otherwise, choose Custom and type the alt text.
- For purely decorative or unimportant images: Under Tagged PDF > Apply Tag select Artifact. This is equivalent to setting null alt text of alt="" in HTML.
Tables
- Designate header row(s): Table > Insert Table, then type the number of header rows.
- Tables with multiple rows of column headers, or tables with column(s) of row headers on the side of the table, require additional markup later in Acrobat Pro.
Ensure Proper Reading Order by Screen Readers
- Open the Articles Panel: Window > Articles.
- Select the objects on the page: Hold down the shift key, then select the objects on the page one by one, sequentially in the order that they should appear in the final reading order for (or select all at once and re-order them later in the Articles Panel).
- Add content to the Articles Panel: Drag all of the selected objects at the same time to the Articles Panel. Give the Article a name. A hierarchical list of objects will appear in the Articles Panel.
- Repeat this process for each page.
Export to PDF
- If primary purpose is web: File > Export > Format: "Adobe PDF (Interactive)" > Save. This will open a new dialog box. Select "Create Tagged PDF" and "Use Structure for Tab Order," then select "OK."
- If document is for print and web: File > Export > Format: "Adobe PDF (Print)" > Save. This will open a new dialog box. Set compatibility to "Acrobat 6 (PDF 1.5)" or higher. Select "Create tagged PDF," "Bookmarks," and "Hyperlinks," then select "OK."
- Not done yet! Follow Acrobat Pro accessibility techniques to finish the process.